Social Media 101 – uploading pictures on Facebook
Here is another Social Media info post from Christine, and we have our 2014 survey ready. It’s a short one, only 15 questions, so please take a moment to answer our questions. It’s your chance to influence the direction of the guild!
We had a positive response to the Social Media 101 post done a while back, but there were some questions regarding uploading pictures onto these social media websites, which will be addressed in this post.
Normally one has to be a member of a social media website, if one wants to upload pictures. If this is the case, then you need to create an identity, whether real or made-up to keep anonymity. Normally this requires an email address. It is recommended that the email address that you use for social media not be linked to any online banking or e-purchases, to be on the safe side.
To create an account, simply follow the instructions with an email address and a password. Once that is achieved, uploading pictures is usually quite simple. There is usually an icon and/or a drop down menu in the top bar.
The social media sites have similar picture uploading functions. Facebook is a good site to start off with.

There are two main ways to upload pictures:
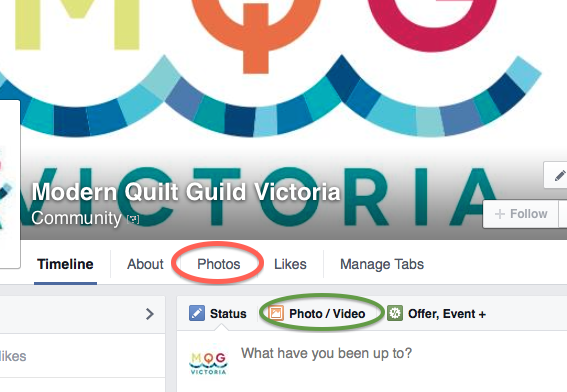
- putting photos on your own separate picture page (here circled in red and green for reference purposes)
- posting pictures onto someone else’s or your own conversation thread
If you want to establish your own picture board, then click on the “Photos” with the red circle. Clicking on the green circle will lead you to the same set-up.

You will end up with a page similar to the one above. You can post all the pictures you want without organisation or you can create separate albums.
I would like to upload the pictures that were taken from the July guild meeting (*ahem* I am a bit behind in my uploads…) . I click on “Add Photos” on the mid-right hand side. I choose the source of my pictures through the window that pops up on my screen to upload. This can be from your computer in your picture file for example, or a shared file like “Dropbox”.

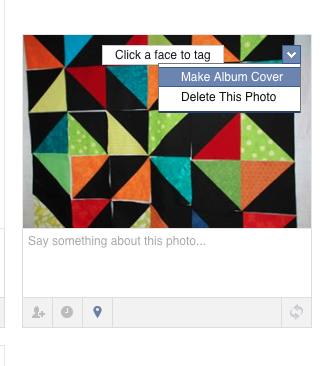
Once you have selected the pictures you want uploaded, you can add in the album title, add any other descriptions you may have etc. If you have uploaded a picture that you regret including, this can be deleted at any time by going to the little drop down menu that appears under the arrow on the right hand side of the photo when you leave your mouse over the image.

Drag the mouse down to “Delete this Photo” to remove picture. As you can see, there is also the option of making this particular photo an “Album Cover”, which will be the picture that will appear on the album, under the album folder. You can also include further description on the picture, identify people that are already on Facebook, add location where picture was taken etc. Just simply move your mouse around to the different icons, and you will normally be provided with explanations. Don’t be shy to try!
You can make the picture “private” for your eyes only, for “friends” on Facebook or “public” for all to see. Make sure you tick off the right box.
You will be notified when all the pictures are uploaded and you can edit at will. When you are finished editing, there is a button on the lower right “Post Photos”. Click on that button and away you go!
You can return to the picture to add comments after it is published.
Once you have posted your pictures on Facebook, it will appear in your conversation thread and notify your friends as well, who may view your photos and perhaps even comment them or “like” them.
Please note that some sites have limits to how many pictures you can upload for free, so it is best to investigate before posting loads of photos.
With regards to uploading pictures on conversation threads, simply click on the camera icon (here with a purple circle for reference purposes) to upload a photo or video from your computer or shared drive with your comment.

As mentioned above, most sites have similar picture uploading mechanisms, so just poke around a bit. If there are any frustrations, do not hesitate to contact us by email.
Good luck!
Thank you Christine for preparing this, and remember:
Thank you Christine for preparing this, and remember:
